動機:可否架設 Laravel 5.5 + Vue 2.1 的現成系統來測試環境及學習操作?!
準備環境:
1.Server: 桌機PC(台式機)+ubuntu 17.10.1, Client: Windows10筆電
2.Nginx 1.12.1 + MariaDB 10.1.30 + PHP 7.1.11(請自行安裝設定)
實作步驟:
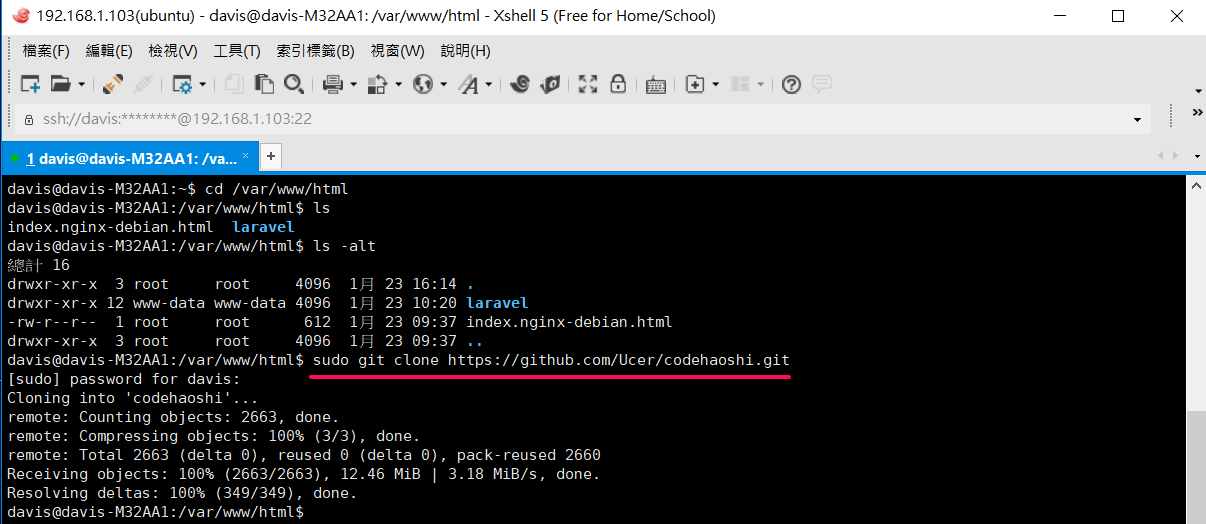
1.依據 參攷1. 下載 (指令: sudo git clone https://github.com/Ucer/codehaoshi.git ),如下圖

2.新增資料庫及使用者,指令如下
$ mysql -u root -p
MariaDB [(none)]> CREATE DATABASE codehaoshi;
MariaDB [(none)]> GRANT ALL PRIVILEGES ON codehaoshi.* TO 'homestead'@'localhost';
MariaDB [(none)]> FLUSH PRIVILEGES;
MariaDB [(none)]> quit
$ mysql -u homestead -psecret
3.修改 目錄屬性,指令如下
$ sudo chown -R www-data:www-data codehaoshi
4.修改 環境設定 .env,指令如下
$ sudo cp .env.example .env
$ sudo nano .env
內容如下
DB_DATABASE=codehaoshi
5.修改 配置文件 config/app.php,指令如下
$ sudo nano config/app.php
內容如下
'timezone' => 'Asia/Taipei',
'locale' => 'zh-TW',
'fallback_locale' => 'zh-TW',
6.修改 文件權限,指令如下
$ sudo chmod 777 -R public
$ sudo chmod 777 -R storage
$ sudo chmod 777 -R bootstrap/cache
7.執行安裝,指令如下
$ sudo composer install
如下圖

8.安裝 node.js, npm 套件(參攷2.),指令如下
$ sudo apt-get update
$ sudo apt-get install nodejs
$ sudo apt-get install npm
如下圖

9.接續安裝,指令如下
$ sudo npm install
如下圖

10.產生 Application Key,指令如下
$ sudo php artisan key:generate

內容如下
use Illuminate\Support\Facades\Schema;
public function boot()
{
Schema::defaultStringLength(191);
}
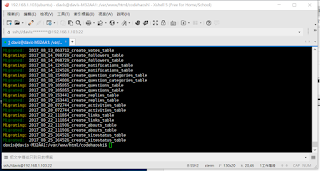
12.執行遷移,指令如下
$ sudo php artisan migrate
如下圖
13.接續安裝,指令如下
$ sudo php artisan passport:install --force
如下圖

14.接續安裝,指令如下
$ sudo composer dump-autoload
$ sudo php artisan codehaoshi:install
如下圖

15.監控資源文件修改
$ sudo npm run watch
如下圖

16.設定 NGINX,指令如下
$ sudo nano /etc/nginx/sites-available/laravel
檔案內容如下
server {
listen 80;
listen [::]:80;
root /var/www/html/codehaoshi/public;
index index.php index.html index.htm;
server_name codehaoshi.com www.codehaoshi.com;
location / {
try_files $uri $uri/ /index.php?$query_string;
}
location ~ \.php$ {
try_files $uri = 404;
fastcgi_split_path_info ^(.+\.php)(/.+)$;
fastcgi_index index.php;
fastcgi_pass unix:/var/run/php/php7.1-fpm.sock; # for Ubuntu 17.10
include fastcgi_params;
fastcgi_param PATH_INFO $fastcgi_path_info;
fastcgi_param SCRIPT_FILENAME $document_root$fastcgi_script_name;
fastcgi_intercept_errors on;
}
17.設定 VirtualHost,指令如下
$ sudo ln -s /etc/nginx/sites-available/laravel /etc/nginx/sites-enabled/
18.重啟 Nginx,指令如下
$ sudo systemctl restart nginx.service
19.修改 Windows hosts 檔案 ( 目錄: C:\Windows\System32\drivers\etc\hosts )
內容如下(IP設為 Server 的IP)
192.168.1.103 codehaoshi.com
20.打開瀏覽器,網址輸入 http://codehaoshi.com/,如下圖

21.註冊第一個帳號,並綁定第一個用戶為超級管理員(supper_admin),指令如下
$ php artisan bindAdmin:Ucer
22.更改 文件屬性,指令如下
$ sudo chown -R www-data:www-data .
後記:
(1).檢視 Laravel 目前版本-artisan,指令如下
$ sudo php artisan --version
(2)新增語系,指令如下
$ cd resources/lang/
$ sudo wget https://campus-xoops.tn.edu.tw/uploads/tad_book3/file/34/zh-TW.zip
$ sudo unzip zh-TW.zip
(3)更新npm並建構出相關CSS及JS,指令如下
$ sudo npm run dev
(4)出現 ErrorException
This cache store does not support tagging. 如下圖
 修改 .env
$ sudo nano .env
內容如下
CACHE_DRIVER=array
再執行指令
$ sudo php artisan cache:clear
即可解決!!
(5)從 5.4 升级到 5.5.0 (參攷4.)
修改文件依賴 composer.json 如下
$ sudo nano composer.json
內容如下
"laravel/framework": "5.5.*",
"phpunit/phpunit": "~6.0"
(6)如何啟用 HTTPS
依 參攷5. 安裝 Certbot,指令如下
$ sudo add-apt-repository ppa:certbot/certbot
$ sudo apt-get update
$ sudo apt-get install python-certbot-nginx
$ sudo nginx -t
$ sudo systemctl reload nginx
$ sudo certbot certonly --webroot --webroot-path=/var/www/html/codehaoshi -d codehaoshi.com -d www.codehaoshi.com
如下圖
 $ sudo nano /etc/nginx/sites-available/laravel
location ~ /.well-known {
allow all;
}
}
參攷:
1.基于 Laravel 5.5 + Vue 2.1 构建的开发笔记记录系统 — Code 好事, http://laravelacademy.org/post/7797.html
2.How To Install Node.js on Ubuntu 16.04, https://www.digitalocean.com/community/tutorials/how-to-install-node-js-on-ubuntu-16-04
3.Laravel 5.5 入門講義, https://campus-xoops.tn.edu.tw/modules/tad_book3/index.php?op=list_docs&tbsn=34
4.从 5.4 升级到 5.5.0, https://d.laravel-china.org/docs/5.5/upgrade
5.How To Secure Nginx with Let's Encrypt on Ubuntu 16.04, https://www.digitalocean.com/community/tutorials/how-to-secure-nginx-with-let-s-encrypt-on-ubuntu-16-04
6.申請Let’s Encrypt憑證與啟用https (Nginx), https://xenby.com/b/101-%E6%95%99%E5%AD%B8-%E7%94%B3%E8%AB%8Blets-encrypt%E6%86%91%E8%AD%89%E8%88%87%E5%95%9F%E7%94%A8https-nginx
準備環境:
1.Server: 桌機PC(台式機)+ubuntu 17.10.1, Client: Windows10筆電
2.Nginx 1.12.1 + MariaDB 10.1.30 + PHP 7.1.11(請自行安裝設定)
實作步驟:
1.依據 參攷1. 下載 (指令: sudo git clone https://github.com/Ucer/codehaoshi.git ),如下圖
2.新增資料庫及使用者,指令如下
$ mysql -u root -p
MariaDB [(none)]> CREATE DATABASE codehaoshi;
MariaDB [(none)]> GRANT ALL PRIVILEGES ON codehaoshi.* TO 'homestead'@'localhost';
MariaDB [(none)]> FLUSH PRIVILEGES;
MariaDB [(none)]> quit
$ mysql -u homestead -psecret
3.修改 目錄屬性,指令如下
$ sudo chown -R www-data:www-data codehaoshi
4.修改 環境設定 .env,指令如下
$ sudo cp .env.example .env
$ sudo nano .env
內容如下
DB_DATABASE=codehaoshi
5.修改 配置文件 config/app.php,指令如下
$ sudo nano config/app.php
內容如下
'timezone' => 'Asia/Taipei',
'locale' => 'zh-TW',
'fallback_locale' => 'zh-TW',
6.修改 文件權限,指令如下
$ sudo chmod 777 -R public
$ sudo chmod 777 -R storage
$ sudo chmod 777 -R bootstrap/cache
7.執行安裝,指令如下
$ sudo composer install
如下圖

8.安裝 node.js, npm 套件(參攷2.),指令如下
$ sudo apt-get update
$ sudo apt-get install nodejs
$ sudo apt-get install npm
如下圖

9.接續安裝,指令如下
$ sudo npm install
如下圖

10.產生 Application Key,指令如下
$ sudo php artisan key:generate
如下圖

11.修改 AppServiceProvider.php,指令如下
$ sudo nano app/Providers/AppServiceProvider.php內容如下
use Illuminate\Support\Facades\Schema;
public function boot()
{
Schema::defaultStringLength(191);
}
12.執行遷移,指令如下
$ sudo php artisan migrate
如下圖

$ sudo php artisan passport:install --force
如下圖

14.接續安裝,指令如下
$ sudo composer dump-autoload
$ sudo php artisan codehaoshi:install
如下圖

15.監控資源文件修改
$ sudo npm run watch
如下圖

16.設定 NGINX,指令如下
$ sudo nano /etc/nginx/sites-available/laravel
檔案內容如下
server {
listen 80;
listen [::]:80;
root /var/www/html/codehaoshi/public;
index index.php index.html index.htm;
server_name codehaoshi.com www.codehaoshi.com;
location / {
try_files $uri $uri/ /index.php?$query_string;
}
location ~ \.php$ {
try_files $uri = 404;
fastcgi_split_path_info ^(.+\.php)(/.+)$;
fastcgi_index index.php;
fastcgi_pass unix:/var/run/php/php7.1-fpm.sock; # for Ubuntu 17.10
include fastcgi_params;
fastcgi_param PATH_INFO $fastcgi_path_info;
fastcgi_param SCRIPT_FILENAME $document_root$fastcgi_script_name;
fastcgi_intercept_errors on;
}
}
17.設定 VirtualHost,指令如下
$ sudo ln -s /etc/nginx/sites-available/laravel /etc/nginx/sites-enabled/
18.重啟 Nginx,指令如下
$ sudo systemctl restart nginx.service
19.修改 Windows hosts 檔案 ( 目錄: C:\Windows\System32\drivers\etc\hosts )
內容如下(IP設為 Server 的IP)
192.168.1.103 codehaoshi.com

21.註冊第一個帳號,並綁定第一個用戶為超級管理員(supper_admin),指令如下
$ php artisan bindAdmin:Ucer
22.更改 文件屬性,指令如下
$ sudo chown -R www-data:www-data .
後記:
(1).檢視 Laravel 目前版本-artisan,指令如下
$ sudo php artisan --version
(2)新增語系,指令如下
$ cd resources/lang/
$ sudo wget https://campus-xoops.tn.edu.tw/uploads/tad_book3/file/34/zh-TW.zip
$ sudo unzip zh-TW.zip
(3)更新npm並建構出相關CSS及JS,指令如下
$ sudo npm run dev
(4)出現 ErrorException
This cache store does not support tagging. 如下圖

$ sudo nano .env
內容如下
CACHE_DRIVER=array
再執行指令
$ sudo php artisan cache:clear
即可解決!!
(5)從 5.4 升级到 5.5.0 (參攷4.)
修改文件依賴 composer.json 如下
$ sudo nano composer.json
內容如下
"laravel/framework": "5.5.*",
"phpunit/phpunit": "~6.0"
更新安裝
$ sudo composer global update
清除數據庫緩存驅動
$ sudo php artisan cache:clear
(6)如何啟用 HTTPS
依 參攷5. 安裝 Certbot,指令如下
$ sudo add-apt-repository ppa:certbot/certbot
$ sudo apt-get update
$ sudo apt-get install python-certbot-nginx
$ sudo nginx -t
$ sudo systemctl reload nginx
$ sudo certbot certonly --webroot --webroot-path=/var/www/html/codehaoshi -d codehaoshi.com -d www.codehaoshi.com
如下圖

內容如下
server {
listen 443 ssl http2;
listen [::]:443 ssl http2;
include snippets/ssl-example.com.conf;
include snippets/ssl-params.conf;
root /var/www/html/codehaoshi/public;
index index.php index.html index.htm index.nginx-debian.html;
server_name codehaoshi.com www.codehaoshi.com;
location / {
try_files $uri $uri/ /index.php?$query_string;
}
location ~ \.php$ {
include snippets/fastcgi-php.conf;
fastcgi_pass unix:/var/run/php/php7.1-fpm.sock;
}
location ~ /\.ht {
deny all;
}
allow all;
}
}
***如果沒有DNS註冊,以上SSL動作會失敗***
(7)Add a existing user to www-data group
$ sudo usermod -a -G www-data davis
$ id davis
$ groups davis
(8)將 laravel 路徑新增至 PATH並於每次登入時使用...
$ echo 'export PATH=/home/davis/.composer/vendor/bin':$PATH >> ~/.bashrc
(7)Add a existing user to www-data group
$ sudo usermod -a -G www-data davis
$ id davis
$ groups davis
(8)將 laravel 路徑新增至 PATH並於每次登入時使用...
$ echo 'export PATH=/home/davis/.composer/vendor/bin':$PATH >> ~/.bashrc
1.基于 Laravel 5.5 + Vue 2.1 构建的开发笔记记录系统 — Code 好事, http://laravelacademy.org/post/7797.html
2.How To Install Node.js on Ubuntu 16.04, https://www.digitalocean.com/community/tutorials/how-to-install-node-js-on-ubuntu-16-04
3.Laravel 5.5 入門講義, https://campus-xoops.tn.edu.tw/modules/tad_book3/index.php?op=list_docs&tbsn=34
4.从 5.4 升级到 5.5.0, https://d.laravel-china.org/docs/5.5/upgrade
5.How To Secure Nginx with Let's Encrypt on Ubuntu 16.04, https://www.digitalocean.com/community/tutorials/how-to-secure-nginx-with-let-s-encrypt-on-ubuntu-16-04
6.申請Let’s Encrypt憑證與啟用https (Nginx), https://xenby.com/b/101-%E6%95%99%E5%AD%B8-%E7%94%B3%E8%AB%8Blets-encrypt%E6%86%91%E8%AD%89%E8%88%87%E5%95%9F%E7%94%A8https-nginx
留言