完成了Part I -- [事前準備] ... 也測通了 Web BlueTooth、BLE 及 micro:bit ... 接下來呢?!
建議先研究 BLE 的架構及運作流程... 參攷 http://shyuanliang.blogspot.tw/2014/10/
引用所述,如下圖
 另外,參攷了另一個 ... https://www.researchgate.net/figure/259333192_fig3_Figure-4-BLE-stack-architecture
引圖如下(優劣自判)

就瞭解了...
在此次實作中 為什麼要在 SMP(Security Manager Protocol) 將 Pairing 解掉,還有一個特性:一個 BLE Device 只能同時被一個中心(Central)連接。一但被連接,BLE Device 就會馬上停止廣播,其他 中心(Central) 就看不到 週邊(Peripheral)設備 了。當連接斷線,就會開始廣播(advertisement)...
接下來,由於看不到 BLE 及 訊號,就如同瞎子摸象,所以我安裝了 Android App -- nRF Connect ( https://play.google.com/store/apps/details?id=no.nordicsemi.android.mcp&hl=zh_TW ) ... 就可以查看 micro:bit 的 BLE Devices 及相關資訊了,如下圖


言歸正題,回到 日本朋友的網文... https://shimz.me/blog/microbit/5476
將其範例 index.html , index.js 複製到web目錄...
從範例中,可以簡單看出作者...使用了 d3.js (Data-Driven Document) 來做 網頁前端 的 資料視覺化呈現, 也可以看出...BLE 具體實現數據的傳輸。它定義了GATT(連線是一次只能連接一個)在兩個 BLE 設備 為 Service 和 Characteristic 進行通信溝通...
實作過程,如下圖


其中,我修改了 index.js(第25行) 的 LED service name ,如下圖

接著,利用 python 來建立 臨時的網頁伺服器 (參攷 https://blog.gtwang.org/web-development/python-simplehttpserver-web-server/ )如下圖

打開 Chrome瀏覧器 (為什麼要選 Chrome, 請參攷 http://caniuse.com/#feat=web-bluetooth )輸入網址 http://localhost:8080 就可以看到網頁畫面,如下圖

注意右上角 藍牙裝置 是 未連線 的,再按下 [接続] 連結 micro:bit BLE device,如下圖

按下 [配對] ... 就可以看到 右上角 藍牙裝置 是 連線 的,再按下 [確定],如下圖

在此,可以同步點~亮/滅 5x5 LED了...如下示範影片
同時也可以打開 Chrome 的 開發人員工具(同時按下option+command+I) 來查看其中BLE協議的過程...
以上,僅能使用 Mac OS X 在 localhost (127.0.0.1) 本機上來玩...
此時,若想要在區網(192.168.1.x)以 Windows10 筆電 的 Chrome瀏覧器 來玩,要如何做呢?!
步驟如下...
由於 Chrome 已經禁止非 https (SSL)的網頁,所以,先改進MacBook筆電的 python https server ... 參攷 https://gist.github.com/dergachev/7028596 下載了 simple-https-server.py 並且 修改第12行 將 localhost => 0.0.0.0 (開放外線IP) ,如下圖

再執行指令 ( openssl req -new -x509 -keyout server.pem -out server.pem -days 365 -nodes ) 建立SSL憑證,如下圖

再執行python程式即可建立 https web server了,如下圖

接下來,到 Windows10筆電...根據 Web BlueTooth 網頁說明 ( https://github.com/WebBluetoothCG/web-bluetooth/blob/gh-pages/implementation-status.md ) 需要安裝 Windows 10 Polyfill 到網頁 https://github.com/urish/web-bluetooth-polyfill 下載 ( git clone https://github.com/urish/web-bluetooth-polyfill ) 並到網頁 ( https://github.com/urish/web-bluetooth-polyfill/releases/ ) 下載 BLEServer-0.3.5.zip 並解壓縮至目錄 C:\Program Files (x86)\Web Bluetooth Polyfill 再開啟 Chrome擴充功能(chrome://extensions/) 勾選 [開發人員模式] 再按下 [載入未封裝擴充功能] 選擇目錄 C:\Program Files (x86)\Web Bluetooth Polyfill\extension ,如下圖

再複製上圖的 ID (每台電腦不同)修改 C:\Program Files (x86)\Web Bluetooth Polyfill\manifest.json 檔案中的 allowed_origins 的 chrome-extension://
再執行指令 C:\Program Files (x86)\Web Bluetooth Polyfill\register.cmd
再到 chrome://flags 確認 Experimental Web Platform features 是未啟用的,如下圖

即可完成安裝 Chrome Extension 支援 Web BlueTooth...
就可以使用 Chrome瀏覽器來玩了,如下圖


不玩了,就按下 [切断],如下圖
 如果有興趣,也可以到 Web Bluetooth / Device Info Sample 示範網頁 (https://googlechrome.github.io/samples/web-bluetooth/device-info.html?allDevices=true) 去測試...
如果你的Android手機是 6.0 的(請參攷 https://github.com/WebBluetoothCG/web-bluetooth/blob/master/implementation-status.md ),也可以玩...如下圖


感謝日本朋友的分享,接下來就要解開新加坡朋友的技法了...
先行暫停打住,且聽下回(Part III)分解...
建議先研究 BLE 的架構及運作流程... 參攷 http://shyuanliang.blogspot.tw/2014/10/
引用所述,如下圖

引圖如下(優劣自判)

就瞭解了...
在此次實作中 為什麼要在 SMP(Security Manager Protocol) 將 Pairing 解掉,還有一個特性:一個 BLE Device 只能同時被一個中心(Central)連接。一但被連接,BLE Device 就會馬上停止廣播,其他 中心(Central) 就看不到 週邊(Peripheral)設備 了。當連接斷線,就會開始廣播(advertisement)...
接下來,由於看不到 BLE 及 訊號,就如同瞎子摸象,所以我安裝了 Android App -- nRF Connect ( https://play.google.com/store/apps/details?id=no.nordicsemi.android.mcp&hl=zh_TW ) ... 就可以查看 micro:bit 的 BLE Devices 及相關資訊了,如下圖


將其範例 index.html , index.js 複製到web目錄...
從範例中,可以簡單看出作者...使用了 d3.js (Data-Driven Document) 來做 網頁前端 的 資料視覺化呈現, 也可以看出...BLE 具體實現數據的傳輸。它定義了GATT(連線是一次只能連接一個)在兩個 BLE 設備 為 Service 和 Characteristic 進行通信溝通...
實作過程,如下圖
其中,我修改了 index.js(第25行) 的 LED service name ,如下圖

接著,利用 python 來建立 臨時的網頁伺服器 (參攷 https://blog.gtwang.org/web-development/python-simplehttpserver-web-server/ )如下圖
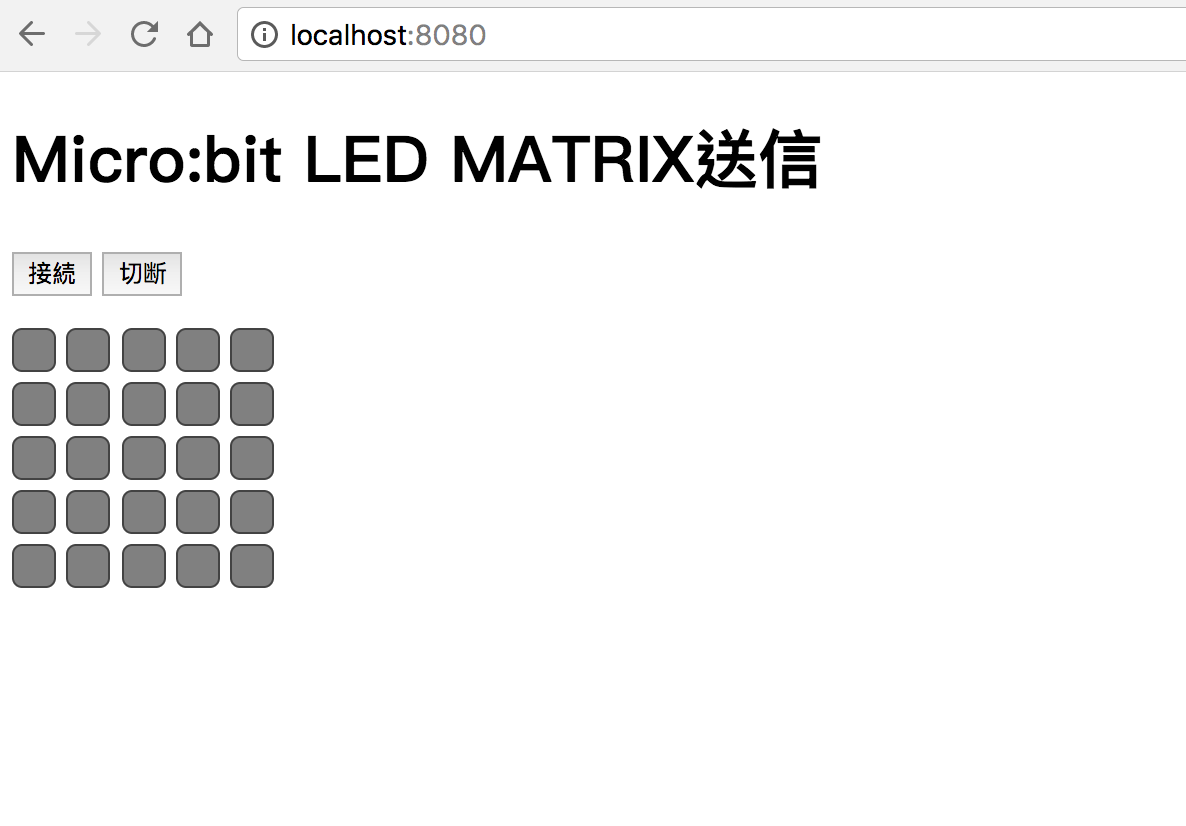
打開 Chrome瀏覧器 (為什麼要選 Chrome, 請參攷 http://caniuse.com/#feat=web-bluetooth )輸入網址 http://localhost:8080 就可以看到網頁畫面,如下圖
注意右上角 藍牙裝置 是 未連線 的,再按下 [接続] 連結 micro:bit BLE device,如下圖

按下 [配對] ... 就可以看到 右上角 藍牙裝置 是 連線 的,再按下 [確定],如下圖

在此,可以同步點~亮/滅 5x5 LED了...如下示範影片
同時也可以打開 Chrome 的 開發人員工具(同時按下option+command+I) 來查看其中BLE協議的過程...
以上,僅能使用 Mac OS X 在 localhost (127.0.0.1) 本機上來玩...
此時,若想要在區網(192.168.1.x)以 Windows10 筆電 的 Chrome瀏覧器 來玩,要如何做呢?!
步驟如下...
由於 Chrome 已經禁止非 https (SSL)的網頁,所以,先改進MacBook筆電的 python https server ... 參攷 https://gist.github.com/dergachev/7028596 下載了 simple-https-server.py 並且 修改第12行 將 localhost => 0.0.0.0 (開放外線IP) ,如下圖

再執行指令 ( openssl req -new -x509 -keyout server.pem -out server.pem -days 365 -nodes ) 建立SSL憑證,如下圖

再執行python程式即可建立 https web server了,如下圖

接下來,到 Windows10筆電...根據 Web BlueTooth 網頁說明 ( https://github.com/WebBluetoothCG/web-bluetooth/blob/gh-pages/implementation-status.md ) 需要安裝 Windows 10 Polyfill 到網頁 https://github.com/urish/web-bluetooth-polyfill 下載 ( git clone https://github.com/urish/web-bluetooth-polyfill ) 並到網頁 ( https://github.com/urish/web-bluetooth-polyfill/releases/ ) 下載 BLEServer-0.3.5.zip 並解壓縮至目錄 C:\Program Files (x86)\Web Bluetooth Polyfill 再開啟 Chrome擴充功能(chrome://extensions/) 勾選 [開發人員模式] 再按下 [載入未封裝擴充功能] 選擇目錄 C:\Program Files (x86)\Web Bluetooth Polyfill\extension ,如下圖

再複製上圖的 ID (每台電腦不同)修改 C:\Program Files (x86)\Web Bluetooth Polyfill\manifest.json 檔案中的 allowed_origins 的 chrome-extension://
再執行指令 C:\Program Files (x86)\Web Bluetooth Polyfill\register.cmd
再到 chrome://flags 確認 Experimental Web Platform features 是未啟用的,如下圖

即可完成安裝 Chrome Extension 支援 Web BlueTooth...
就可以使用 Chrome瀏覽器來玩了,如下圖


不玩了,就按下 [切断],如下圖

如果你的Android手機是 6.0 的(請參攷 https://github.com/WebBluetoothCG/web-bluetooth/blob/master/implementation-status.md ),也可以玩...如下圖


感謝日本朋友的分享,接下來就要解開新加坡朋友的技法了...
先行暫停打住,且聽下回(Part III)分解...
留言